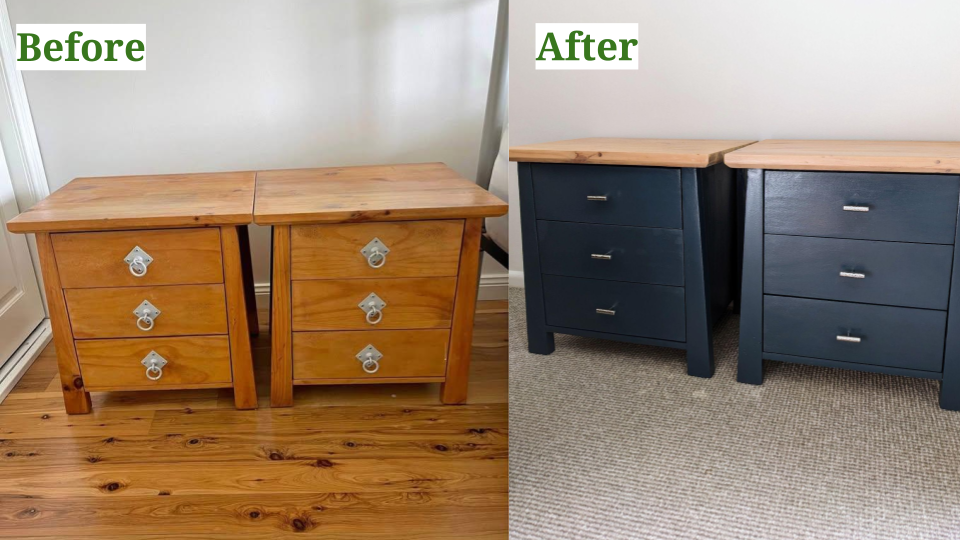
Bedside Tables Upcycle: Modernising Facebook Marketplace Find
- Devon Long
- Feb 8, 2025
- 3 min read
Updated: Feb 14, 2025

I have been slowly been re-designing our bedroom, as it was filled with furniture from my husband's bachelor days. The last piece of the puzzle was the bedside tables, which were in dire need of an upgrade.
The Starting Point

While hunting for bedside tables, I focused on two key factors: dimensions and basic structure. These tables had clean lines underneath their dated finish, making them ideal candidates for a modern makeover without requiring any structural changes. The drawers were also already on runners or slides, which is my least favourite thing to fix. At $40 AUD I thought these were a good find.
The Transformation
Step 1: Prep Work
As with any upcycling project, proper preparation is key. I started by:

Giving them a good clean to remove any grime and dirt
Removed the old hardware
Spackled over the old hardware holes
Did a few repair jobs on the particle board at the back
Once they were ready, I started sanding. I did a thorough sand on the tops, progressing through to finer and finer sand paper, while I really just did a scuff sand on the bottoms.
Step 2: The New Look

My original plan was to simply clear-coat the wood tops, assuming the yellow tone was just the result of an old or dated finish. However, after sanding, I discovered this was actually the natural color of the wood - a yellow that would clash with my lighter, oatmeal-colored wooden bed.
This led me to try my first-ever tan wash technique. I mixed tan paint with water in roughly a 40:60 ratio, applied it to the wood, and waited less than 30 seconds before wiping it off with a cloth. The result was perfect - it neutralized the yellow tones while still letting the natural wood grain show through.

For the legs and drawers, I had paint custom-matched to my bedroom pillows and throw in a beautiful slate color - a sophisticated blue-gray that ties everything together perfectly. They provide this colour matching service free of charge at Bunnings Warehouse (and likely other hardware stores) so just go to the paint counter and ask.
For the final layers of paint, I removed the drawers to ensure I could get a clean finish on the inside of the frame and the top and sides of the drawers. For these kind of recessed slides, it's really easy to remove the drawers - they typically have some kind of screw on the inside of the drawer. Just undo those and the outer slide will come off easily, while the inner slide will remain attached.
Step 3: Protection & Polish
To ensure longevity and a professional finish, I applied a clear protective coat. This not only guards against water marks and daily wear but also gives the wood tops a beautiful sheen.
Step 4: Final Touch

New hardware completed the modern transformation. I selected hammered chrome T-bar knobs that add texture and contemporary flair while maintaining a timeless appeal. You can find the ones I ordered here. Their metallic finish catches the light beautifully and adds an elegant detail to the piece.

The Result
What started as a $40 marketplace find is now a sophisticated set of bedside tables that looks like it came from a high-end furniture store. The entire project cost just $126.50 AUD ($40 for the tables, $7 for tan wash, $11 for custom-matched slate paint, and $68.50 for the premium hardware) - proving that you don't need to break the bank to achieve custom, quality pieces that perfectly match your space.
I think they match my bed/bed linen perfectly!

What do you think? Does this match my bed set? Leave your thoughts in the comments below.


Comments